Showing posts with label git. Show all posts

5/06/2021

Find the commit which broke the test in git

Scenario

Find the first broken git commit.

Scenario in details

However the main purpose of git is version control, it can be also useful for debugging.

You found a bug in the system, your first two questions are of course: who did it and when?

Let git help you to figure it out in a fast way.

Detailed description of the solution

Case 1 - Manual verification of commits

If you don’t have an automated way to verify if a commit contains the bug or not, then follow case 1.

The solution will be git bisect. You can enter bisect mode with the command git bisect start.

Then you have to mark your current commit bad, as it contains the bug. Type the git bisect bad command. As the next step you have to mark the last known good commit, so a commit where the bug was still not present. For that you may have to try out several commits. But if you remember that it was still working 2 days ago, then just pick a commit from that day. You can checkout each commit to test. Once you found a good commit use the command git bisect good hash_of_the_good_commit. If the current head is the good commit you can skip the hash from the end of the command.

Now git bisect will checkout some commits. Determine for each if they contain the bug or not and mark them with git bisect good or git bisect bad. After several steps Git bisect will tell you the first good commit. If you think you made a mistake you can restart the bisect process anytime, just type git bisect reset.

Case 2 - Automated verification of commits

You can make this process faster if you have a script or any executable which can determine if the bug is present or not. You can even use a test framework. The point is only that the executable shall return 0 if the bug is not present and anything else if the bug is present.

Similarly to case 1 enter bisect mode with the command git bisect start.

Then you have to mark your current commit bad, as it contains the bug. Type the git bisect bad command. As the next step you have to mark the last known good commit, so a commit where the bug was still not present.

Once you marked one good and one bad commit just use the command git bisect run path_to_your_executable. Here the executable is either a standalone script, but it can be even a call to your test framework with some parameters.

After this step git bisect shows you the first bad commit.

Step-by-step guideline

Case 1 - Manual verification of commits

  1. Type git bisect start - It starts the bisect process

  2. Type git bisect bad - It marks the current commit as “bad”

  3. Type git bisect good hash_of_the_last_working_commit - Mark “good” the last commit where you are sure the bug was not present

  4. Now git bisect will checkout a commit which is between the current and the last good commit. Compile it and test it. If the bug is present type git bisect bad, otherwise git bisect good.

  5. Repeat step 4 until you can’t find the commit

Case 2 - Automated verification of commits

  1. Implement a test which returns 0, if the bug is not present and non zero if the bug is present (most of the test frameworks already works in this way, so it is enough to implement some simple unit test in most of the cases)

  2. Type git bisect start

  3. Type git bisect bad

  4. Type git bisect good hash_of_last_working_commit

  5. Type git bisect run your_test

Test your knowledge

You can test your knowledge here:

https://github.com/lmarcell/git_practical_exercises_bisect


Additional git material

You can find more useful information related to git in the following ebook:

5/18/2020

Advanced GIT Tutorial - How to debug your code with GIT?

Introduction

Unfortunately every software developer knows that things are often going wrong. Something breaks the build, something else breaks the tests. Someone makes changes which don’t fit with the coding guidelines etc.
It can be pretty difficult in such cases to figure out what went wrong, long long hours and days of debugging is needed sometimes.
Fortunately git can also help in such situations. Let’s see some builtin git commands which can make your life easier if something went wrong in your project.

Figure Out, Who Introduced The Guilty Line

You are reading a code and you find a line. “Who the hell did it?” - this is your first question. Maybe you don’t understand the purpose of the line or it is not following the coding guidelines or it is the root cause of a bug. The first thing that you can do is to check the git log for that file and figure out which commit contains the relevant change. It can be time consuming, especially if there’s a long history of the file and the relevant change happened long back in the time.
There’s another, more efficient solution: git blame.
Just type git blame filename. It will show you for each line, which commit was the last one that modified it.
This way it is pretty easy to figure out who did the change and what was its purpose.

Find The First Broken Commit

You found a bug in the code. You know that a week ago it was still not present and you don’t know the exact root cause yet. It would help a lot if you knew which commit introduced the bug, you could save a lot of debugging-time.
Git bisect is the best solution in this situation. Git bisect is a binary search method in your commit history. It can even handle the merge commits. Let’s see how it works:
  1. Type git bisect start - It starts the bisect process
  2. Type git bisect bad - It marks the current commit as “bad”
  3. Type git bisect good hash_of_the_last_working_commit - Mark “good” the last commit where you are sure the bug was not present
  4. Now git bisect will checkout a commit which is between the current and the last good commit. Compile it and test it. If the bug is present type git bisect bad, otherwise git bisect good.
  5. Repeat step 4 until you can’t find the commit
Thanks for the power of binary search, it is a pretty fast method to find the guilty commit.
It can cause issues with this method if the bug is not consistent, it randomly appears in some commits.

Automatize The Search Process

It can be time consuming to test the commits manually.
Fortunately it can be automated. Git bisect also supports running automated tests.
  1. Implement a test which return 0 if the bug is not present and non zero if the bug is present (most of the test frameworks already works in this way, so it is enough to implement some simple unit test in most of the cases)
  2. Type git bisect start
  3. Type git bisect bad
  4. Type git bisect good hash_of_last_working_commit
  5. Type git bisect run your_test
This method will find the first commit where your bug is present.

Summary

Both git blame and git guilty can be very useful in situations when you have to figure out what is the root cause of a bug. It can be much faster than using a classical debugging approach, given that you committed frequently enough.

3/12/2020

Advanced GIT tutorial - Interactive rebase

Introduction
It can often happen that you did something wrong by using GIT: you gave the wrong commit message, created too few or too many commits, you have commits in the wrong order or with the wrong content. To change such things you have to change history in GIT. Interactive rebase in GIT is an efficient and powerful tool for that.

The idea of interactive rebase

Git rebase can change the commits between the current HEAD and a dedicated commit. You can define the commit either by its hash or by its index relative to the current HEAD by giving HEAD~n, where n is the index. So HEAD~10 means the 10.th commit before the current HEAD.
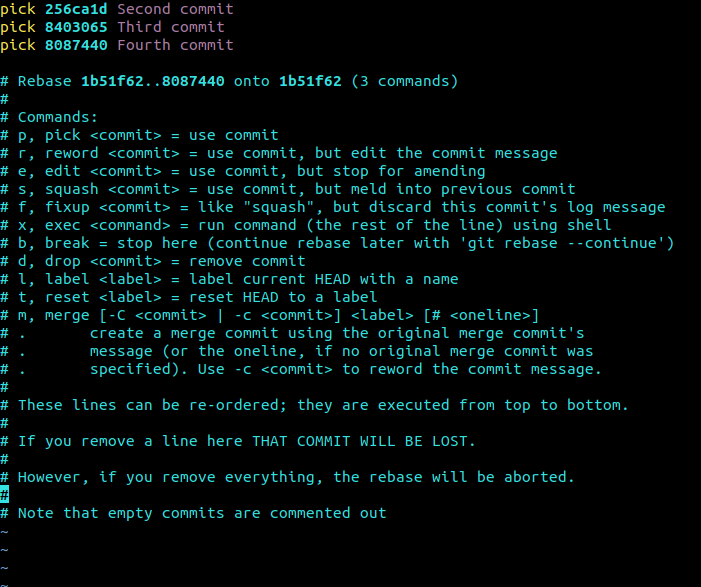
To change the last 3 commits before the current HEAD type git rebase --interactive HEAD~3 or git rebase --interactive hash_of_the_third_commit_after_head. Pay attention, the third commit after HEAD is practically the fourth commit in git log, since the first is the HEAD itself. Instead of --interactive you can also type -i. This command will open your default editor and list your last three commits. The format is something like:
pick hash_id commit_message for each commit.
The very first thing you can do is to change the order of the commits in this file. It is pretty straight-forward, just change to order of the lines
Other than that you have the following options with each of the commits:
  • Pick (p): You would like to keep that commit as it is, this is the default action.
  • Reword (r): You would like to change the commit message of the commit.
  • Edit (e): You would like to change the content of the commit
  • Squash (s): It merges the commit with the previous one, keeping both the commit messages
  • Fixup (f): Same as squash, but it keeps the commit message of the previous commit
  • Exec (x): Executes a custom shell command
  • Break (b): It stops the rebasing at that commit, you can continue later with git rebase --continue
  • Drop (d): It drops that commit together with its content. That’s the best way of getting rid of a commit
  • Label (l): It attaches a label to the given which is the actual HEAD: Pay attention! The parameter here is not a commit id.
  • Reset (t): It resets the label of the current HEAD commit. It is also not expecting a commit id.
  • Merge (m): It creates a merge commit.
You should just write the right keyword or its abbreviation (in brackets) before he commit id.

Resolve issues by interactive rebase

Here is a small collection of real life scenarios which can be resolved by interactive rebase.

Change commit order

As already mentioned, you can change the order of the commits. If you want to change the order of the last 10 commits:
  1. Type git rebase --interactive HEAD~10
  2. You  see now the list of commits is your default editor. Change their order as you wish.
  3. Save this file, resolve all conflicts
There’s a huge chance that you have to resolve some rebase conflicts, in this case change them, add the changed file with calling git add and type git rebase --continue at the end. Since the rebasing is commit based it can be that you have to fix similar conflicts in the same file multiple times.

Get rid of unnecessary commits

It can happen, that you would like to remove a commit with its content, do the following:
  1. Type git rebase --interactive HEAD~10 (to remove some commits from the last 10)
  2. Change the “pick” to “drop” in the lines of commits to be removed
  3. Save the file and resolve the conflicts
That’s it, you removed the unnecessary commits with all their content.

One commit instead of multiple commits

Sometimes you created too many simple commits and you would like to make your history more clean with less commits. You can simply merge the content of multiple commits into one.
  1. Type git rebase --interactive HEAD~10 (to merge some commits from the last 10)
  2. Change the “pick” to “fixup” in the lines of commits to be merged into the previous ones
  3. Save the file

Change the commit message of old commits

What to do if you want to change the commit message of an older commit?
  1. Type git rebase --interactive HEAD~10 (to change the message of some commits from the last 10)
  2. Change the “pick” to “reword” in the lines of commits to be renamed
  3. Save the file
  4. The current commit message will appear in your editor, change it and save it

Edit an old commit

How to change the content of an older commit?
  1. Type git rebase --interactive HEAD~10 (to change some commits from the last 10)
  2. Change the “pick” to “edit” in the lines of commits to be edited
  3. Save the file
  4. Do the changes you want, add them by git add and commit them by git commit --amend
  5. Type git rebase --continue
  6. Resolve all the conflicts

Split commit

How to split an already existing commit?
  1. Type git rebase --interactive HEAD~10 (to split a commit from the last 10)
  2. Change the “pick” to “edit” in the lines of the commit to be splitted
  3. Save the file
  4. Type git reset
  5. Add the changes for the first commit and commit it
  6. Add the changes for the second commit and commit it
  7. git rebase --continue

Summary


In my view interactive rebasing in git is a very powerful option which can make several scenarios easier and faster. But in order to use it in an efficient way you have to really know how it works.

2/14/2020

Advanced GIT tutorial - Cherry-pick vs rebase vs merge

Introduction
One of the most important features of GIT is branching. The development of multiple functionalities can be done parallel, independently of each other.
In the end of course a version will be needed which includes functionalities from multiple branches. The article is a brief overview on the methods about how you can create such a version.

Overview on GIT branches

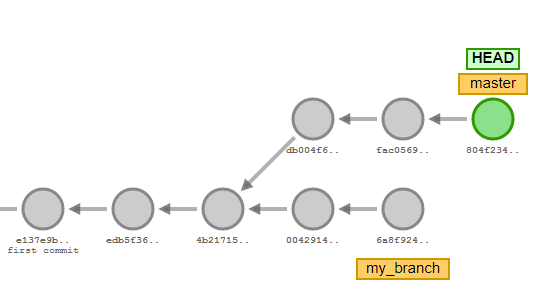
In GIT every commit knows its parent. So the list of your GIT commits is a one-way linked list, representing the order of the commits. By default you are working on a branch named master. A branch is always stored as a simple hash id, which is the hash id of the latest commit on the branch. You can anytime start a new branch based on the current HEAD commit by the command git branch branch_name. This command creates a new branch, pointing to the current commit. Then you can change to this branch by git checkout branch_name. This will change your HEAD to your branch. Or you can do these steps together by typing git checkout -b branch_name.
On a branch you can work independently from the master branch. You can implement a new functionality, fix a bug or do some refactoring. In the meanwhile others are working on the master branch or on some other branches. Until you are working on your functionality new functionalities will be added to the master branch. At this point you have to create a version which has all the content of the current master plus your changes from your branch. There are three ways to do it. Let’s see the details.

Merge

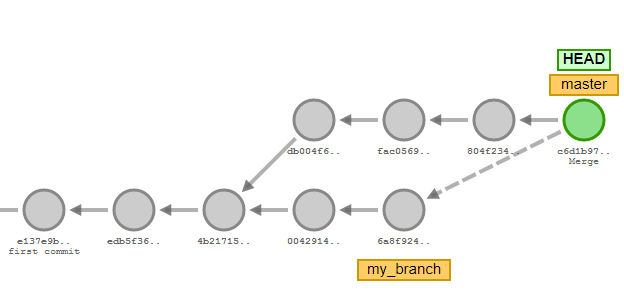
The first, very classical way is git merge. While being on master branch (you can always check your current branch by typing git branch) type git merge your_branch. This command will create a new merge commit to the master branch.
What is a merge commit?
In GIT every commit has one single parent commit, except merge commits which have two or even more parents. The command git merge master creates a merge commit with two parents: the last commit of your branch and the last commit of master. So that by checking out this commit you will have both the changes on the master and on your branch.  During merging conflicts can appear if the same lines have been modified on the two branches. In this case these conflicts have to be manually resolved.
Before merging always make sure that your branches are up to date with the remote branch.
The big advantage of git merge is that the history of the commit stays clear and unchanged.
The disadvantage is that large amount of merge commits can make the branch history unreadable.

Rebase

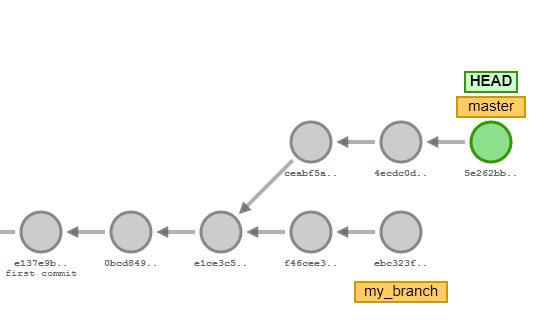
The second option is git rebase. Git rebase is changing the parent of the first commit on your branch. So git rebase master will change the parent of the first commit of your branch to the latest commit on the master branch.
To be able to do it all commits on the branch needs to be modified, because in this way they will contain the change being done on the master. Since you are changing the commits, their hash id will also change. So technically they will be new commits. That also means that multiple instances of the same commit (rebased and non-rebased) can appear in the git log. You really have to pay attention!
Furthermore git rebase is being done commit by commit, so the same conflicts can appear again and again.
The advantage of this method is that your history will stay one straight line, on the other hand it won’t be possible to figure out later, that a git rebase happened.
You should especially pay attention to rebasing if multiple developers are working on the same branch.

Cherry-pick

Git cherry-pick is the best command if you want to move only one (or some) commit from different branches to the current branch.
For example you have a bugfix commit on one of your branches and you don’t want to merge the whole branch to the master, only the one commit which is fixing the bug. You should checkout the master branch and type git cherry-pick commit_id, where commit_id is the hash id of the bugfix branch. This command will create a new commit (with a new commit id) on the master branch, which has the very same changes as the cherry-picked commit. The cherry-picked commit will stay untouched.

Summary of merge, rebase and cherry-pick

To summarize the topic: git merge doesn’t change any existing commit, it just creates a new merge commit, which has two or more parents.
Git rebase changes the parent of the one commit (usually the root of the branch, or the commit given as a parameter). With other words it is rewriting the history of the branch (or commit). The commits get a new hash id.

Git cherry-pick reapplies one dedicated topic on the current branch, with a new commit id. The cherry-picked commit stays untouched.

How I prepared my first online course

Since long I didn't publish anything here. It's because I was busy with some other topics, but now it's time to share the result...