4/03/2020

Software quality assurance in practice

Introduction

Every software developer has some idea of a good quality project (bug free, fast, easy to adapt, readable code base etc.). Some of the developers also have an idea how to achieve it (reviews, TDD, proper design, proper testing etc.). All these practices need to be collected and followed is a way.
Software quality assurance is something that is on the side of any development, regardless of the development process. Some way of quality assurance is used by all big companies. The goal of software quality assurance is to have a clear picture about the quality and try to reach and maintain a predefined level of quality.

Theory of software quality assurance

Most of the companies have a dedicated quality assurance team or at least one dedicated person who is responsible for the quality of the projects. That means it should be someone who is not involved in the project, who makes no development on that, this person rather makes sure that the development team does everything in the correct way. Quality assurance is involved in each and every step of the development process: planning and tracking of the project, requirements engineering, software design, implementation and testing.
The very first point is to set up rules to be followed by the whole development team: how should a requirement be documented, which level of software design is required in which situations, who and how should review the work, which coding guideline is to be followed etc.
Once it is done the role of the quality team is to make sure that during the project everyone is following the predefined rules. To be able to achieve it the activities should be documented in a clear way. For example, if someone did a review of a piece of code it should be documented in a way, that it can be always proved later that the given version of the given code has been reviewed.
There are predefined software quality standards and frameworks, like the different versions of SPICE or CMMI, which have several predefined rules, but every project and organization is free to set up their own ruleset.

Software quality assurance in practice

Setup rules and performance indicators

In practice the very first step to set up the rules for the development: coding guidelines, testing guidelines, responsibility matrices etc.
Some of them should be introduced right at the beginning of the project. But introducing all of them at the beginning can really go against performance and the success of the project. So some of these rules can be introduced in a later stage of the project.
Some of these rules are pretty binary: either they are followed or not. Like the rules in the coding guideline: “don’t use variable names longer than 15 character”. It is very easy to decide if this rule is followed or not.
There are other cases where the answer is not so clear. A good example is test coverage. Most of the projects require unit tests, but it is not needed that each and every line is covered by these tests. In these cases so called key performance indicators (KPI) should be set up. This thing should be quantified and measurable. For example for code coverage there are multiple possible KPI’s: line coverage, branch coverage, etc. It should be decided what is the official measurement method in the project.
These rules can be relevant for any step of the development (planning, requirements, design, coding, testing etc.).

Measure your indicators

Once we know the rules to be followed we have to figure out a way to measure them. The best way is if we can automate these measurements by some tools and integrate them to the continuous integration system of the project. So that you will have continuous feedback about the state of the project, you can follow how its quality changes. It is good practice to introduce these KPIs to the whole team. Most of the tools which can do the measurement on different KPIs are easy to integrate, in other cases you can use some scripts to do the job.

Setup goals

Once the KPIs are measured and known by the team setup some goals. Like “the code coverage should reach 80%” or the number of compiler warnings should be 0, every component has to be linked to requirements etc. Let the team know these goals and let them work on them. Give regular feedback to the team about the distance from the goals and the achieved changes. It can be done by daily report emails. All these goals need to be documented in a clear way.
The most typical goals are the following:
  • Design has to be linked to requirements
  • Code needs to be linked to design
  • Positive review should be done before merging
  • Test should be linked to requirements
  • Coding guidelines should be followed. (for that a proper coding guideline is required)
  • Code should be covered by tests
  • Memory assumption/runtime should be in a dedicated range
  • The piece of change (commit) should be connected to a ticket in the ticket system
  • Tickets in the ticket system should be connected to requirements

Setup gates

Finally, you can set up some built-in gates to the CI system. That means it doesn’t allow to merge code which is violating any of the rules, like: contains compiler warnings, failing some checks, not covered by tests, has failing unit tests etc. This can reduce the speed of development, but increase its quality.
In general too strict rules can be against productivity, pay attention! You should always pass the rules to the project needs. So most likely the expected quality in case of a mobile game will be much lower than in the case of an aeroplane software.

Summary

Quality assurance is nothing complicated. I tried to describe it in a practical manner and not in a principled way. But one thing is important: you have to be strict, the rules which have been set up, need to be followed.

3/12/2020

Advanced GIT tutorial - Interactive rebase

Introduction
It can often happen that you did something wrong by using GIT: you gave the wrong commit message, created too few or too many commits, you have commits in the wrong order or with the wrong content. To change such things you have to change history in GIT. Interactive rebase in GIT is an efficient and powerful tool for that.

The idea of interactive rebase

Git rebase can change the commits between the current HEAD and a dedicated commit. You can define the commit either by its hash or by its index relative to the current HEAD by giving HEAD~n, where n is the index. So HEAD~10 means the 10.th commit before the current HEAD.
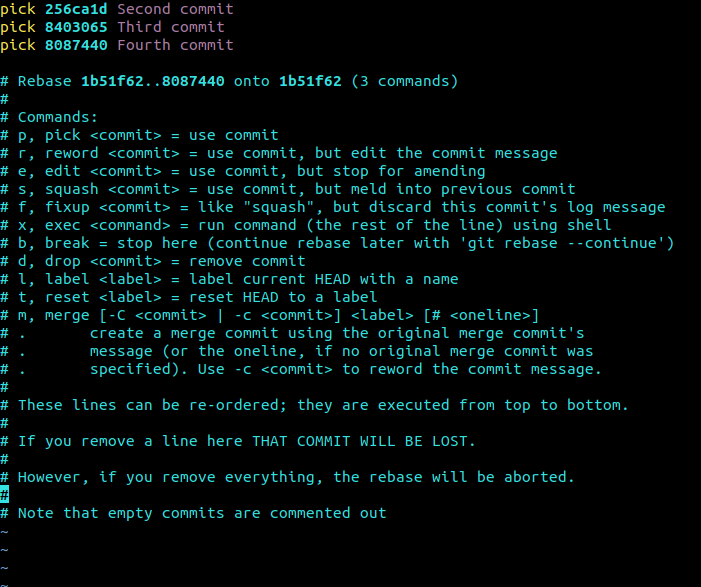
To change the last 3 commits before the current HEAD type git rebase --interactive HEAD~3 or git rebase --interactive hash_of_the_third_commit_after_head. Pay attention, the third commit after HEAD is practically the fourth commit in git log, since the first is the HEAD itself. Instead of --interactive you can also type -i. This command will open your default editor and list your last three commits. The format is something like:
pick hash_id commit_message for each commit.
The very first thing you can do is to change the order of the commits in this file. It is pretty straight-forward, just change to order of the lines
Other than that you have the following options with each of the commits:
  • Pick (p): You would like to keep that commit as it is, this is the default action.
  • Reword (r): You would like to change the commit message of the commit.
  • Edit (e): You would like to change the content of the commit
  • Squash (s): It merges the commit with the previous one, keeping both the commit messages
  • Fixup (f): Same as squash, but it keeps the commit message of the previous commit
  • Exec (x): Executes a custom shell command
  • Break (b): It stops the rebasing at that commit, you can continue later with git rebase --continue
  • Drop (d): It drops that commit together with its content. That’s the best way of getting rid of a commit
  • Label (l): It attaches a label to the given which is the actual HEAD: Pay attention! The parameter here is not a commit id.
  • Reset (t): It resets the label of the current HEAD commit. It is also not expecting a commit id.
  • Merge (m): It creates a merge commit.
You should just write the right keyword or its abbreviation (in brackets) before he commit id.

Resolve issues by interactive rebase

Here is a small collection of real life scenarios which can be resolved by interactive rebase.

Change commit order

As already mentioned, you can change the order of the commits. If you want to change the order of the last 10 commits:
  1. Type git rebase --interactive HEAD~10
  2. You  see now the list of commits is your default editor. Change their order as you wish.
  3. Save this file, resolve all conflicts
There’s a huge chance that you have to resolve some rebase conflicts, in this case change them, add the changed file with calling git add and type git rebase --continue at the end. Since the rebasing is commit based it can be that you have to fix similar conflicts in the same file multiple times.

Get rid of unnecessary commits

It can happen, that you would like to remove a commit with its content, do the following:
  1. Type git rebase --interactive HEAD~10 (to remove some commits from the last 10)
  2. Change the “pick” to “drop” in the lines of commits to be removed
  3. Save the file and resolve the conflicts
That’s it, you removed the unnecessary commits with all their content.

One commit instead of multiple commits

Sometimes you created too many simple commits and you would like to make your history more clean with less commits. You can simply merge the content of multiple commits into one.
  1. Type git rebase --interactive HEAD~10 (to merge some commits from the last 10)
  2. Change the “pick” to “fixup” in the lines of commits to be merged into the previous ones
  3. Save the file

Change the commit message of old commits

What to do if you want to change the commit message of an older commit?
  1. Type git rebase --interactive HEAD~10 (to change the message of some commits from the last 10)
  2. Change the “pick” to “reword” in the lines of commits to be renamed
  3. Save the file
  4. The current commit message will appear in your editor, change it and save it

Edit an old commit

How to change the content of an older commit?
  1. Type git rebase --interactive HEAD~10 (to change some commits from the last 10)
  2. Change the “pick” to “edit” in the lines of commits to be edited
  3. Save the file
  4. Do the changes you want, add them by git add and commit them by git commit --amend
  5. Type git rebase --continue
  6. Resolve all the conflicts

Split commit

How to split an already existing commit?
  1. Type git rebase --interactive HEAD~10 (to split a commit from the last 10)
  2. Change the “pick” to “edit” in the lines of the commit to be splitted
  3. Save the file
  4. Type git reset
  5. Add the changes for the first commit and commit it
  6. Add the changes for the second commit and commit it
  7. git rebase --continue

Summary


In my view interactive rebasing in git is a very powerful option which can make several scenarios easier and faster. But in order to use it in an efficient way you have to really know how it works.

2/26/2020

Which tools should be used for your project

Introduction
To work on a project in a professional way you will need thousands of tools. Your tools can determine the success of your project. I collected the most important tools you should use for your project.

Tools

Ticketing system

The most important tool is to have a proper ticketing system. Regardless of the process you are following it’s making it possible to track the tasks to be done and the state of the tasks. It is also nice that everyone can add comments to the tasks, so that all hints and discussions can be documented in a traceable format. This system can be connected with the version control system, so that you can have a proper connection between your code and tasks. Most popular ticketing systems are JIRA and Redmine.

Bug tracker system

A bug tracker system stands for tracking the state of all detected bugs in the software. It makes you sure that you won’t miss any of the bugs. It is also nice that you can search the already resolved bugs and see what was their root cause and solution. It helps you to fix new bugs. Very often bug tracking is also done by the ticketing system. One example is Mantis.

Requirement handler system

In big projects, especially if you are following a classical development process (Waterfall, V-model) then you need a tool which is used for documenting all the requirements. Of course it can be done in word or any other text document, but a proper requirement handler has a lot of additional features: it is version controlled, it can do linking between requirements, requirements can be filtered and ordered based on different attributes, the requirements can be categorized.

Project planning/tracking system

There should be a project management tool used for planning of the tasks and resources and tracking the progress of the project. Sometimes it is integrated into the ticketing system, in other cases excel is used for this purpose. But the clearest solution is still to use a professional tool.

Version control system

This is a really must-to-have tool. You need a version control system which can track the changes of a code and it makes possible the parallel work of multiple developers on the same base of code. Most widely used version control systems are GIT and SVN.

UML editor tool

UML is a proper tool to document and visualize the architectural and dynamic design of your software. You have a high variety of diagrams to visualize your software from different perspectives (class diagram, object diagram, sequence diagram, state diagram etc.). UML is basically a semi-formal documentation of your software. It is possible to draw UML diagrams on paper or in a drawing software, but is proposed to use a professional tool for this purpose. My absolute favorite one is Enterprise Architect. Unfortunately it is only for Windows and it costs a lot. But it can properly format the diagrams, link the related diagrams between each other, control the different versions, handle different permissions and it can also generate some code from the diagrams.

Continuous integration system

It is also suggested to have a server with a continuous integration system. It can regularly build your code, run the tests and do additional code quality checks. So that you always have a clear picture about the current state of your code base and you can also set up some quality gates. Jenkins is a really good CI framework for starting.

IDE

IDE means integrated development environment. This is a tool which helps you to edit your code. But it also has support for navigation inside your code and you can usually integrate plugins for compiling, debugging or for version control. There is a high variety of IDEs like: Visual Studio, VSCode, QT Creator, Netbeans, Eclipse, etc. Fortunately, most of them are free.

Compiler

If you are not working with some interpreted language you will need a compiler to build your code. It is always up to the used language which ones can you use.

Interpreter

If you are working with interpreted code, like Python you will need it (instead of compiler) to be able to run your code.

Debugger

A debugger makes it possible to have a more detailed view on your code when you are running it. It makes it possible to see the call stack, the value of the variables and it also makes it possible to put so called breakpoint into the code. The run of your program should be paused at the breakpoints, so that you can analyze its state. With a debugger you can also run your code line-by-line. Most debuggers are integrated into IDEs. To use a debugger you have to compile your code with specific debug option, so that the compiler is generating additional debug information.

Code formatter

Most of the big projects have guidelines for the formatting of your code: usage of spaces and tabs, maximum length of lines, where to put the braces and brackets etc. Your code can be automatically formatted based on custom rules with some code formatter tools. For example for C++ you can use clang format. These tools can be integrated into your IDE, so that you can make sure that you are not violating any of such guidelines.

Static code analyzer

A static code analyzer checks your code without running it. It can be detected: unused variables and parameters, usage of uninitialized memory fields, violation of naming guidelines etc. It is really suggested to setup such a tool for your project to ensure better quality.

Dynamic code analyzer

A dynamic code analyzer similar to the static one, is also checking your code, but it is checking it while running. It can detect issues like memory leaks, and possible runtime errors.

Profiler

A profiler can measure the runtime and the memory consumption of your software in critical scenarios. You are supposed to use it in case of embedded development or if your software is using a lot of memory or CPU.

Test framework

If you want to run automated tests on your software you will need a test framework. In fact you can use different framework to your code on different levels: unit tests, component tests, acceptance tests, smoke tests etc.

Communication tool

You also need a communication tool which can be used within the team for communication. It is nice if it supports screen sharing and remote control of computers and if it is documenting all discussion properly. You have thousands of choices, like Slack, Skype for Business etc.

Time and holiday tracker tool


Last but not least you need a tool to track the holidays and the working time of the team members. However in some organizations working time is not tracked anymore, most of the companies are still using it for different purposes. It’s nice if the developers can book their time on different projects and tasks. It helps the project managers to get a clearer picture of the progress of the project.

2/14/2020

Advanced GIT tutorial - Cherry-pick vs rebase vs merge

Introduction
One of the most important features of GIT is branching. The development of multiple functionalities can be done parallel, independently of each other.
In the end of course a version will be needed which includes functionalities from multiple branches. The article is a brief overview on the methods about how you can create such a version.

Overview on GIT branches

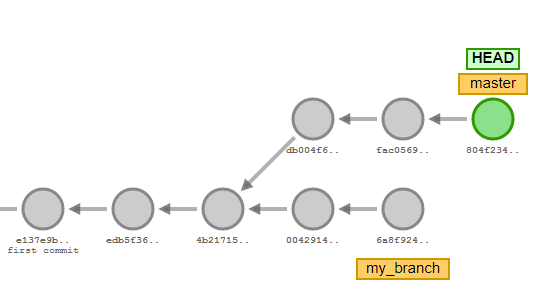
In GIT every commit knows its parent. So the list of your GIT commits is a one-way linked list, representing the order of the commits. By default you are working on a branch named master. A branch is always stored as a simple hash id, which is the hash id of the latest commit on the branch. You can anytime start a new branch based on the current HEAD commit by the command git branch branch_name. This command creates a new branch, pointing to the current commit. Then you can change to this branch by git checkout branch_name. This will change your HEAD to your branch. Or you can do these steps together by typing git checkout -b branch_name.
On a branch you can work independently from the master branch. You can implement a new functionality, fix a bug or do some refactoring. In the meanwhile others are working on the master branch or on some other branches. Until you are working on your functionality new functionalities will be added to the master branch. At this point you have to create a version which has all the content of the current master plus your changes from your branch. There are three ways to do it. Let’s see the details.

Merge

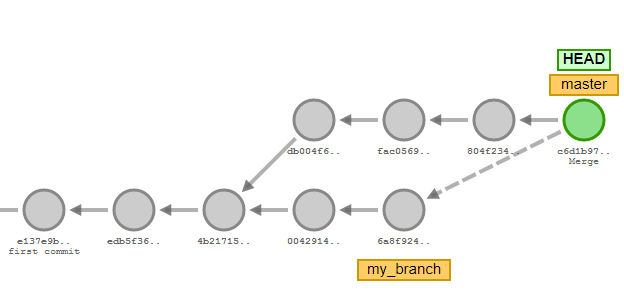
The first, very classical way is git merge. While being on master branch (you can always check your current branch by typing git branch) type git merge your_branch. This command will create a new merge commit to the master branch.
What is a merge commit?
In GIT every commit has one single parent commit, except merge commits which have two or even more parents. The command git merge master creates a merge commit with two parents: the last commit of your branch and the last commit of master. So that by checking out this commit you will have both the changes on the master and on your branch.  During merging conflicts can appear if the same lines have been modified on the two branches. In this case these conflicts have to be manually resolved.
Before merging always make sure that your branches are up to date with the remote branch.
The big advantage of git merge is that the history of the commit stays clear and unchanged.
The disadvantage is that large amount of merge commits can make the branch history unreadable.

Rebase

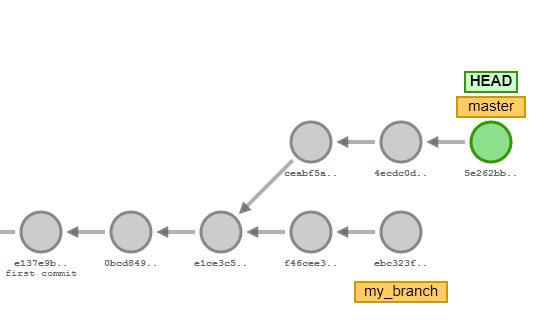
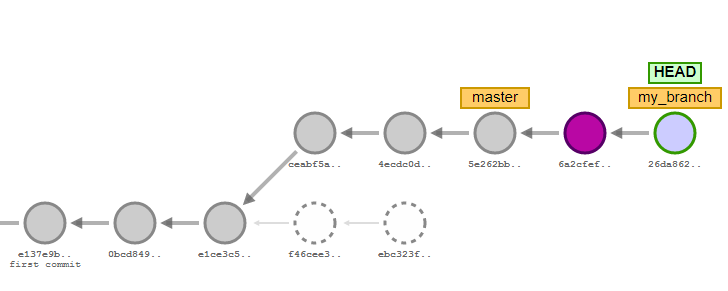
The second option is git rebase. Git rebase is changing the parent of the first commit on your branch. So git rebase master will change the parent of the first commit of your branch to the latest commit on the master branch.
To be able to do it all commits on the branch needs to be modified, because in this way they will contain the change being done on the master. Since you are changing the commits, their hash id will also change. So technically they will be new commits. That also means that multiple instances of the same commit (rebased and non-rebased) can appear in the git log. You really have to pay attention!
Furthermore git rebase is being done commit by commit, so the same conflicts can appear again and again.
The advantage of this method is that your history will stay one straight line, on the other hand it won’t be possible to figure out later, that a git rebase happened.
You should especially pay attention to rebasing if multiple developers are working on the same branch.

Cherry-pick

Git cherry-pick is the best command if you want to move only one (or some) commit from different branches to the current branch.
For example you have a bugfix commit on one of your branches and you don’t want to merge the whole branch to the master, only the one commit which is fixing the bug. You should checkout the master branch and type git cherry-pick commit_id, where commit_id is the hash id of the bugfix branch. This command will create a new commit (with a new commit id) on the master branch, which has the very same changes as the cherry-picked commit. The cherry-picked commit will stay untouched.

Summary of merge, rebase and cherry-pick

To summarize the topic: git merge doesn’t change any existing commit, it just creates a new merge commit, which has two or more parents.
Git rebase changes the parent of the one commit (usually the root of the branch, or the commit given as a parameter). With other words it is rewriting the history of the branch (or commit). The commits get a new hash id.

Git cherry-pick reapplies one dedicated topic on the current branch, with a new commit id. The cherry-picked commit stays untouched.

How I prepared my first online course

Since long I didn't publish anything here. It's because I was busy with some other topics, but now it's time to share the result...